How to install kitchen backsplashes
The first step in installing kitchen backsplashes is to clean the surface where they will be placed. Make sure this area is clean and dry before you begin. Next, carefully measure the space to determine the size of the backsplashes needed. Accurate measurements are important to ensure a perfect fit.
Preparation of necessary materials and tools
Before beginning the installation, make sure you have all the necessary materials and tools within easy reach. You will need backsplash adhesive, a putty knife, a spatula, a spirit level, a pencil, and a ruler. Also, be sure to have clean cloths on hand to wipe away any excess adhesive.
Kitchen backsplash installation
To install your kitchen backsplash, apply a thin layer of special adhesive to the back of the backsplash. Then, place the backsplash onto the surface and press it firmly to ensure a good bond. Use a spirit level to ensure the backsplash is perfectly straight. Allow it to dry according to the manufacturer's instructions, then clean off any excess adhesive with a damp cloth. Your kitchen backsplash is now installed and ready to use!
Required materials
Clean & dry cloth
Level
Measuring tape
Application spatula (included)
Xacto style knife
Painters tape

1. Preparing the surface
The surface must be smooth, clean and dry. You can use a damp cloth to ensure no dust remains on the wall. Ensure that no residue is on the wall, such as drips of dry paint and be sure to well sand any imperfections as they may show through the vinyl.It is important to wait at least 2 weeks after the wall has been painted before installing your mural.
2. Preparing your installation
It is recommended to have two people for the installation.
The back of every panel is numbered and must be installed from left to right. Begin by placing the panel #1 to the left. When you are happy with the placement secure it with the painters tape. The second person can now hold the panel in place to ensure it does not move. Before moving on, you will now use your level to ensure the panel is straight.
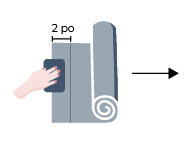
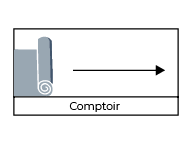
3. Installing panel #1
Now your panel is taped to the wall and the second person is holding it to ensure it does not move. You will peel away 2” of the vinyl from the top of the panel and cut away the white paper. Apply the top of the mural to the wall. Roll your mural with the image side in so you can access the top of the backing paper. Gently pull down on the backing exposing the adhesive side of the mural. Using your spatula covered with a cloth, firmly apply the mural to the wall. If any bubbles appear, you can pierce them with a needle and push the air out with your fingers.
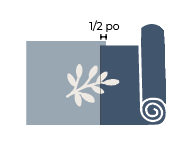
4. Installing panel #2
Every other panel will overlap onto the previous panel by 0.5”. Install the next panel the same way as panel #1 making sure to respect the 0.5” of overlap and that the image on the second panel matches the image on the first.
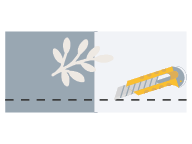
5. Trimming the excess
Once all the panels are installed, you can cut away any excess vinyl with your exacto style knife.
View or download our PDF
View PDFAny questions ?
We are easy to reach and it would be our pleasure to answer any questions or ease any concerns.


